As a web developer who wants to focus on design and development, and not content maintenance, it is important to give clients a means to modify the content on their site themselves. This is often done with a content management system (CMS) like WordPress, and a WYSIWYG editor that generates HTML behind the scenes, so that the client doesn't have to deal with the markup.
In many cases, this may not be the best solution. If you are creating custom content and styling from scratch without using existing themes, then incorporating a CMS system can be inconvenient. Maybe the client isn't familiar with a CMS. Maybe the content is well-structured, with specific types of information. Maybe the client's content changes are minor, i.e. don't involve new pages or features. Maybe you want your HTML elements to have certain class names for styling purposes. In these cases, you may not want to use a traditional CMS.
You want to give your client a system that is:
- Intuitive and easy to use
- Immediate
- Hard to break
- Does not require your help
- Versatile
The method I discuss in this article uses Google Sheets in lieu of a traditional CMS, and I believe it fills these needs. The client manually manages the content through the Google Sheet - creating, updating, and deleting. On the site, when someone visits the web page, a script reads data from the Sheet, and updates the content (HTML) on the page accordingly. Changes to the Google Sheet are reflected on the site immediately.
Retrieving Data From a Google Sheet
There are at least three ways to retrieve data from a Google Sheet:
- Using Google Sheets API
- Using a Google Apps Script
- Using a third-party library like Tabletop.js
I chose to use option 3, Tabletop.js, because:
- It's easy to setup, and only takes a few minutes to get started.
- It keeps all the site-specific code with the site, not the sheet.
- No authentication complications.
This option may be slower and less secure, as you have to make your sheet publicly readable by anyone. For this scenario of a restaurant menu, where traffic shouldn't be excessive or spiky, and the content is public regardless, I don't expect this to be an issue. There is always risk with dependency on a third-party library, but knowing that you can use other methods if necessary brings some comfort.
Building a Menu Page
To make a menu web page, I will follow the instructions provided by Tabletop.js and Jae Johns' Article.
Create a Google Sheet
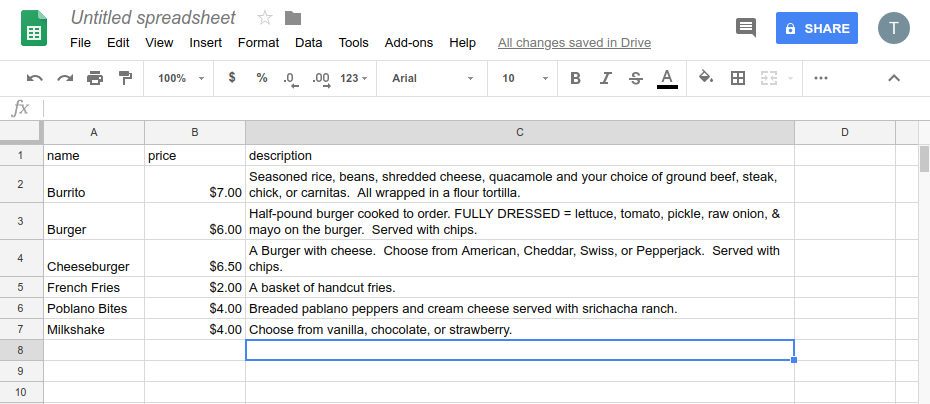
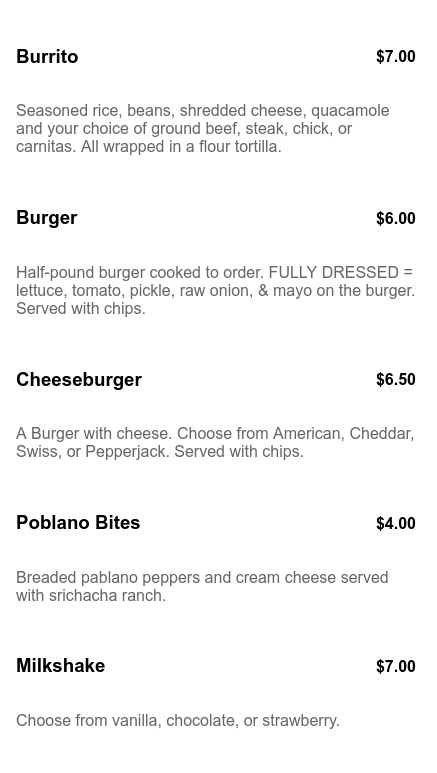
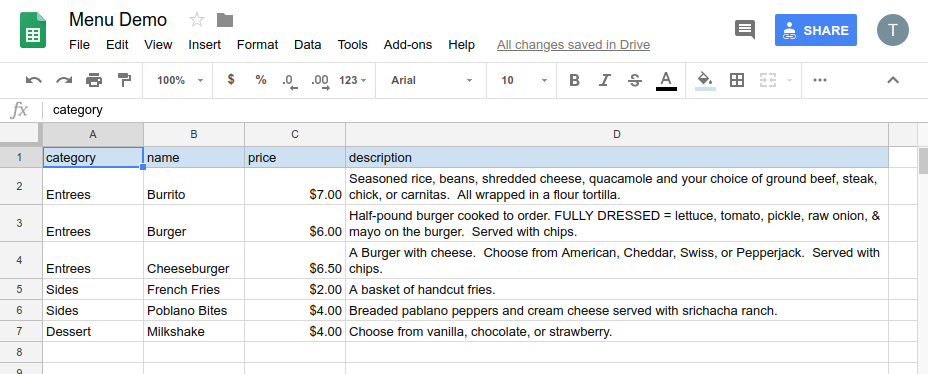
First, we need to create a new blank sheet for our menu data. Then we can populate our sheet with some sample data. The first row defines the column names, and is important to include.
name	price	description
Burrito	$7.00	Seasoned rice, beans, shredded cheese, quacamole and your choice of ground beef, steak, chick, or carnitas.  All wrapped in a flour tortilla.
Burger	$6.00	Half-pound burger cooked to order. Fully dressed = lettuce, tomato, pickle, raw onion, and mayo on the burger.  Served with chips.
Cheeseburger	$6.50	A Burger with cheese.  Choose from American, Cheddar, Swiss, or Pepperjack.  Served with chips.
French Fries	$2.00	A basket of handcut fries.
Poblano Bites	$4.00	Breaded pablano peppers and cream cheese served with srichacha ranch.
Milkshake	$4.00	Choose from vanilla, chocolate, or strawberry.
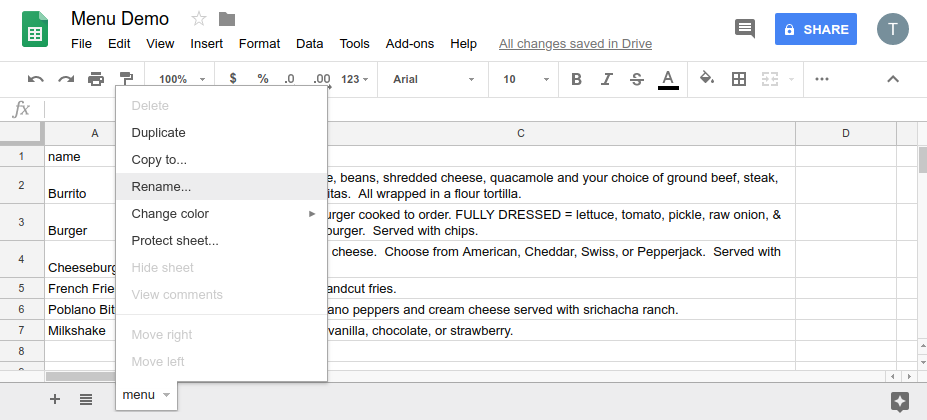
Let's rename the spreadsheet and our Sheet1:
We need to publish the sheet to the web. From File > Publish to the web..., click Publish.
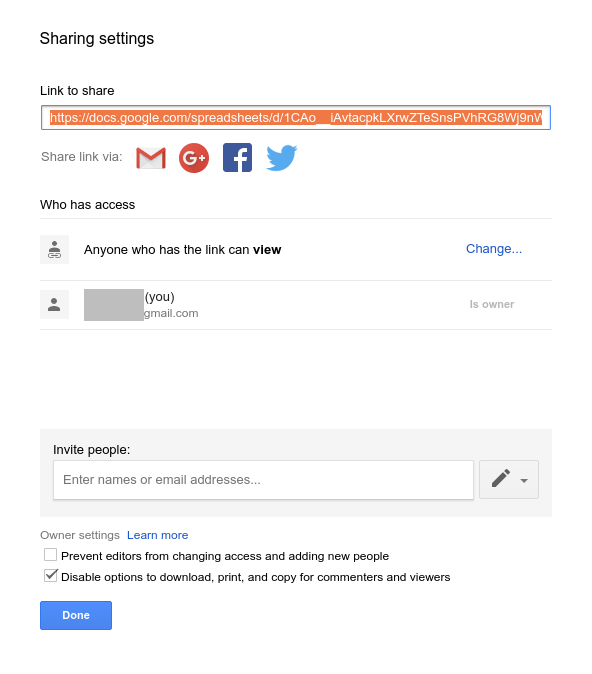
We also need to share the sheet. To do that:
- Click the
SHAREbutton in the top right corner. - Click
Advanced. Change...access toOn - Anyone with the link.- Make sure
Access: AnyonesaysCan view, so no one else can edit the data. - Click the
Savebutton.
Copy the Link to share, or at least note its existence - we will need it in a bit.
Initialize Tabletop
Our sheet is ready, so now we need to create our menu web page. Create a new html document somewhere. In the body, create a div with class="menu". This is where our menu is going to go.
We need to add 2 scripts to our document. The first retrieves Tabletop.js from a CDN. The second initializes Tabletop, and defines a callback function, which is executed after retreiving data. We need to use our sharing link for our sheet for publicSharingUrl. Note also that we are setting the simpleSheet option to False. You can read more about Tabletop options on it's github page.
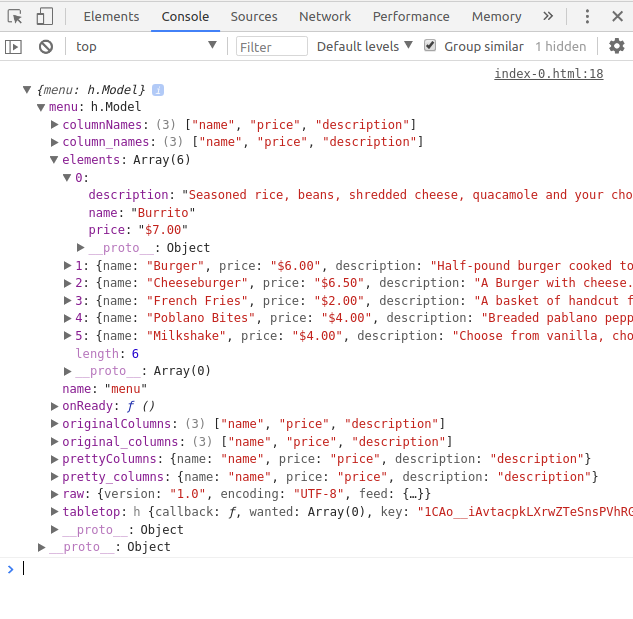
Now when we open our HTML file in the browser, we should receive an alert that data was retreived, and the data should be printed to the developer console.
Modify Page Content
Now that we are successfully retreiving data, we need to display it on our page. In our showInfo callback function, we can build up an HTML string by looping through each row in our spreadsheet (data.menu.elements) and adding a name header, a price header, and a description paragraph. We then replace the inner HTML of the menu div with this HTML string:
Now, when we visit the page, our menu items should appear once the data is retreived.

We now have a working menu page that updates with changes to the spreadsheet! Try modifying the spreadsheet in various ways and reloading the page to see what happens. You may discover that an empty row in your table will cause the data reader to stop reading rows.
Getting Fancier
Styling
This menu page is not very pretty, but you can now style it however you want. You can add some structure and classes to your HTML string, and throw in some CSS styling:
And now we're making a little progress:
Ultimately, you can make the menu as beautiful as you want, it's just a matter of structuring the HTML appropriately in your Tabletop callback, and creating the associated CSS.
Coding
Our example menu is overly simplistic. Most menus have more than just a few items, and tend to group items into categories like Entrees, Sides, etc. To incorporate this, we can add a new column to our sheet, and then add some code to handle the new information.
In the code below, I have added a groupByCategory function which groups the data rows (elements) by their category. I've also added a menu-category div to the menuHtml string to wrap all items of a given category.
Now our page is starting to look a little like a real menu:
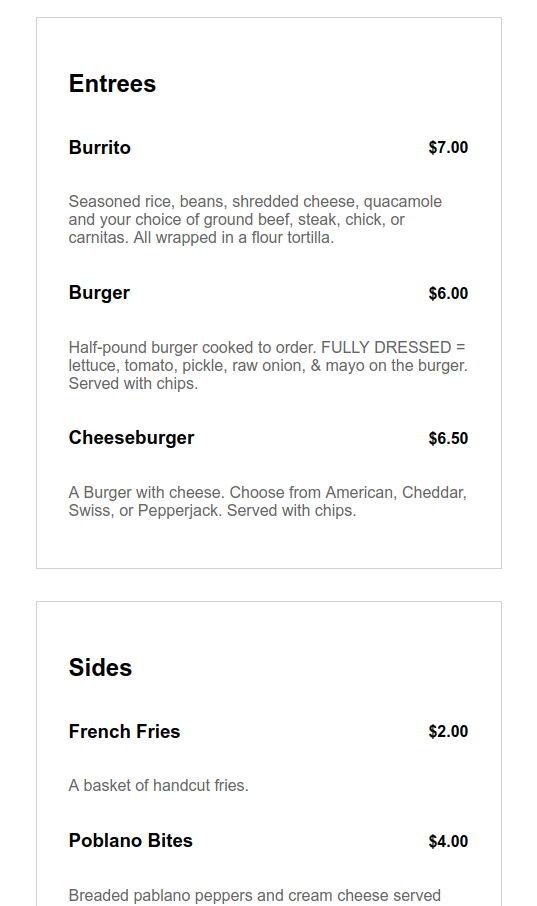
You can now add new items with new category names to the Google Sheet, and they will appear on the menu page. Category misspellings will result in undesired categories, but you can catch this visually on the site, or add data validation to the sheet to prevent it.
This is merely an example of how you can improve your menu by adding data to your sheet and handling it in code. There are all sorts of ways you can make this fancier. Another useful feature may be a boolean column - maybe include or publish - that lets your client immediately select which items do and don't appear on the menu.
Deployment
You've likely noticed that it takes some time for the data to be retrieved and the menu to appear. You could add a loading indicator while it waits, but a better user experience may be to have a default menu in place initially, which is then updated once the data from the sheet has been retreived and the new menuHtml is built. Then if the menu hasn't been modified, the user will see it immediately. To do this, simply hard-code the HTML for the latest menu in your div.menu (you can copy it from the developer tools panel). Ideally, edits made to the sheet by the client will be minor, and won't result in a drastic change in the appearance of the menu upon update. Then your updates to the hard-coded default menu can be relatively infrequent.
Better yet, if you have a build process for your site, you can use the same code to grab the latest Google Sheet data and construct the default menu HTML upon build. Furthermore, if you're using a continuous deployment service like netlify to build and serve the site, you can just trigger a new deploy with the press of a button from anywhere!
Validation
To ensure your update menu appears and behaves correctly, you might want to add validation checks on the data retrieved from the sheet, or on the built HTML string. I don't have examples here, but you could ignore data rows from the sheet that are missing vital pieces of information, or check that the HTML structure is valid before you replace the default menu. You can also add data validation to the sheet, e.g. drop-down selectors.
Note that because this method inserts the text from the Google Sheet directly into HTML, any HTML tags in the text will show up on the site. You may or may not want this. It adds great versatility on one hand, but risk of breaking the HTML on the other. For example, you could include some span elements to specifically style something, but an accidental HTML tag like <a could cause unexpected behavior. Other characters may require escaping.
Additional Concerns
Code Depends on Column Names
The column names defined on the sheet are used to access the data in javascript. Therefore you need to make sure these column names are javascript-compatible and aren't changed. You should protect them in the Google Sheet (Tools > Protect Sheet...).
Immediate Publishing
This is both an advantage and disadvantage of this method. Whoever is editing the sheet should be checking the site as they edit to make sure everything looks right. The site may be publicly wrong for a bit, but hopefully this is infrequent.
There are solutions to this if it is a problem. You could use the boolean include or publish column mentioned above that is set to true after verifying that all the data in the row is correct. Further, you could configure a separate secret testing URL that is updated regardless of verification. Then the client can play around on the secret page to make sure everything looks good before publishing to the public page.
Speed at Scale
I have not yet tested this method outside of my local machine, so I am not sure how well it scales yet. Performance will depend on how quickly Tabletop.js can retreive the data. Even in a worst-case scenario, however, users will still get the default menu almost immediately.
Security
All of your Google Sheet data is public on the web, so be careful with what you put on there. You should make sure that your Sharing settings don't allow strangers to edit your data. Furthermore, it's wise to backup your sheet in case the file is somehow deleted or destroyed.
Beyond the Menu
We used a restaurtant menu as an example, but recognize that it is very versatile. Google Sheets is really just a database on the cloud with intuitive editing tools, version control, permissioning, and HTTP accessibility. You can use this method for a variety of things. Just for a restaurant website, you can use it for:
- Schedule of events that is displayed based on today's date.
- Daily specials that are displayed according to the day of the week.
- Draft list that changes.
- List of team members.
- Paragraphs of text.
You can put all of these items on a separate worksheet in a single Google Sheet, and use them accordingly on the site.